Motion sensor
Introduction
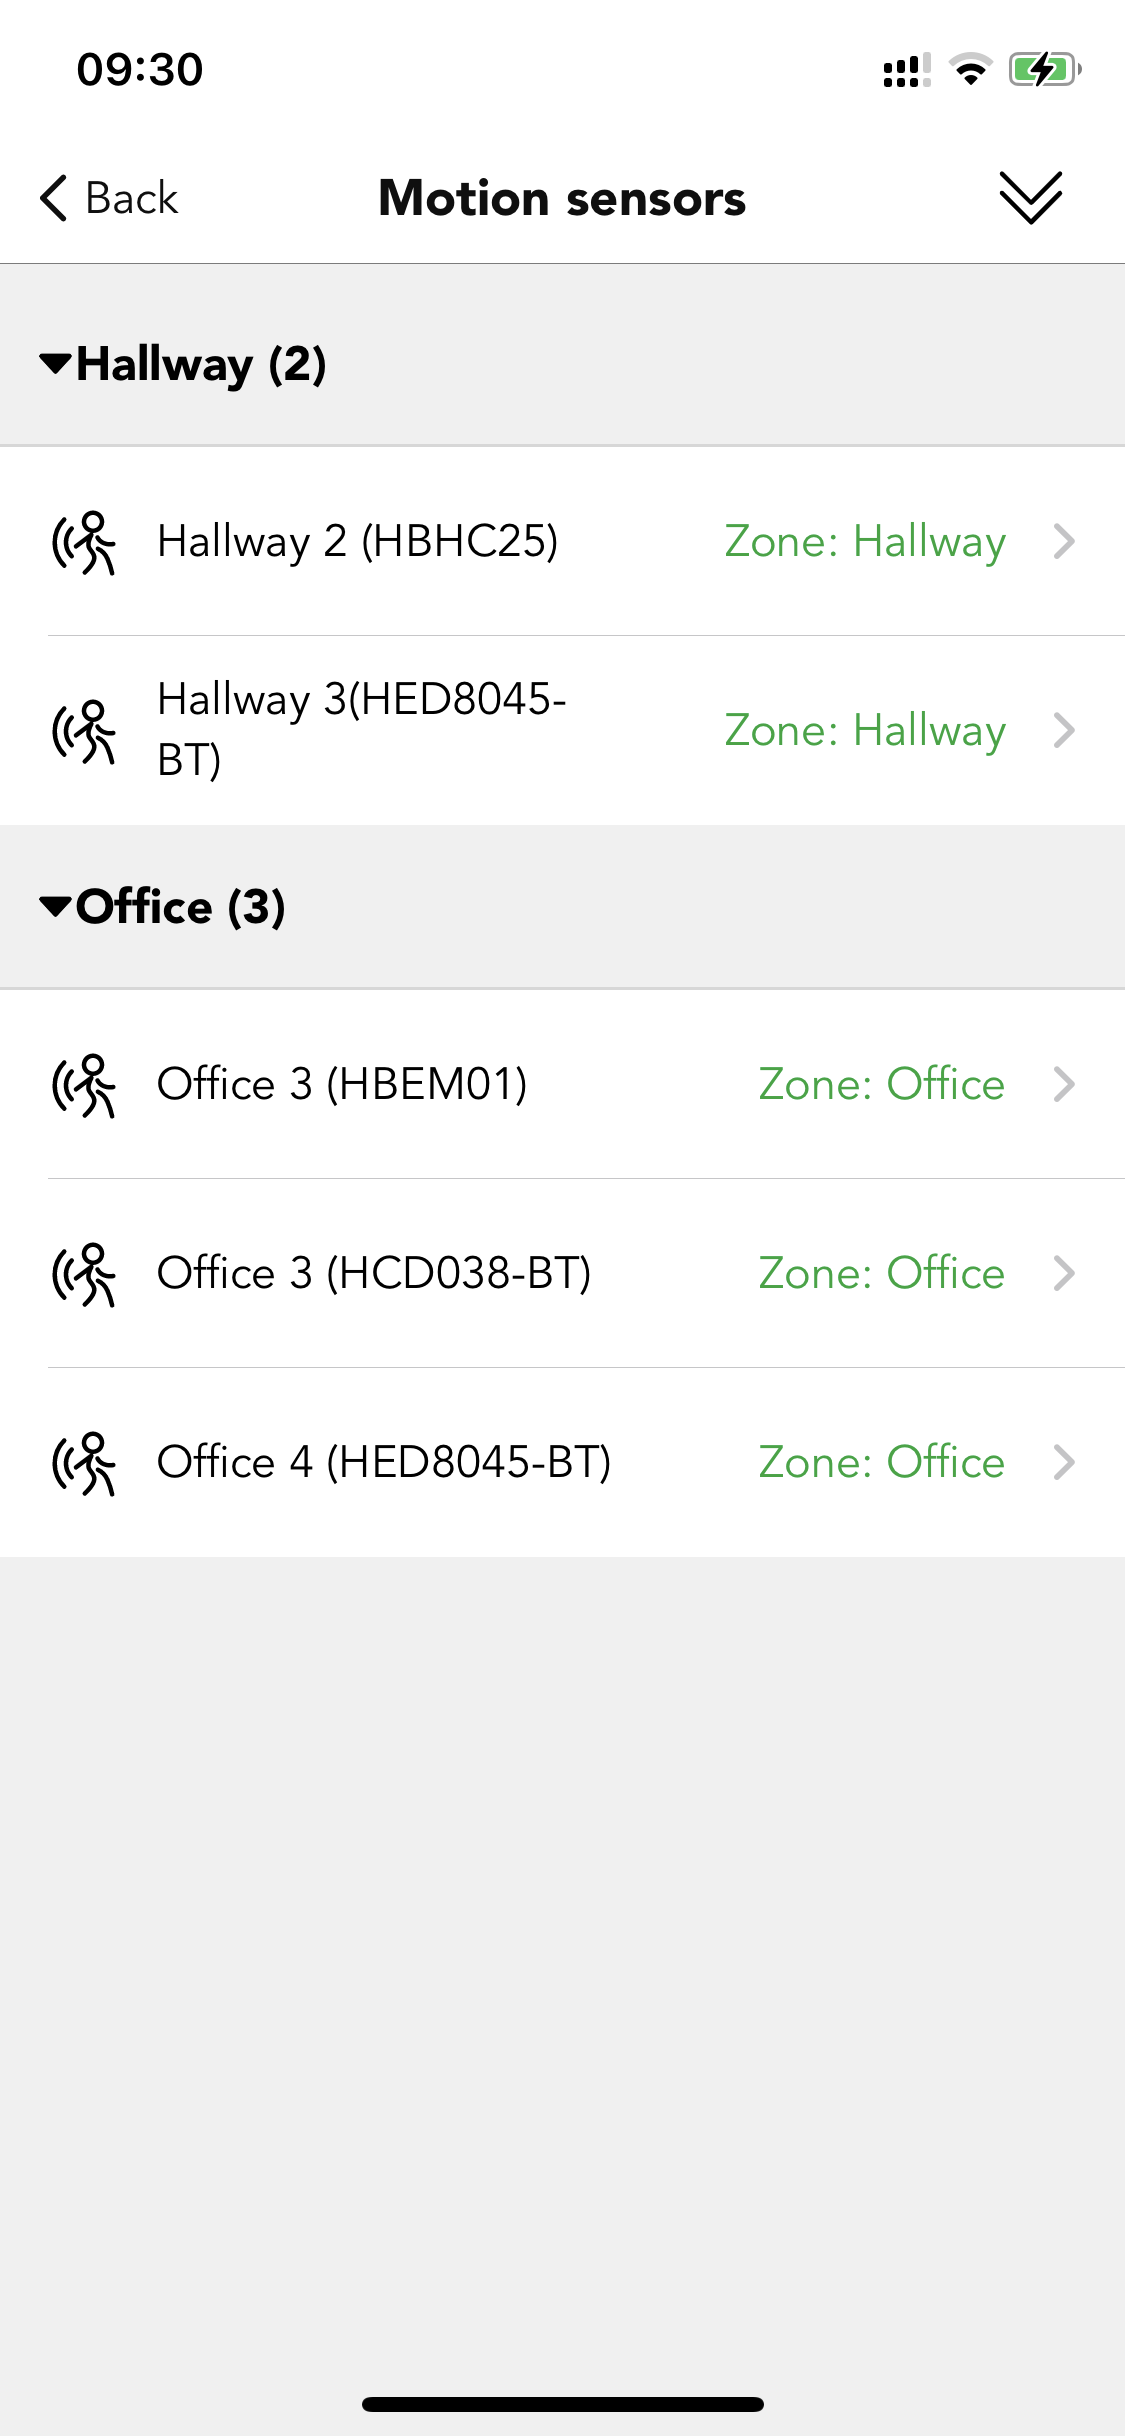
All the added motion sensors should be found under the motion sensor section in the function menu page. Motion sensor is the most important part of the Koolmesh system. It is the core of auto-control. In this motion setting, users can define a lot of settings related to the motion sensor including the tri-level control.
After clicking on the “motion sensor”, it will display a list of all the sensors that are in different zones. When the motion sensor is activated by the movement, then there is a red dot under the human icon that will flash one time. On the right will display which zone or group or luminaires are controlled by this motion sensor.
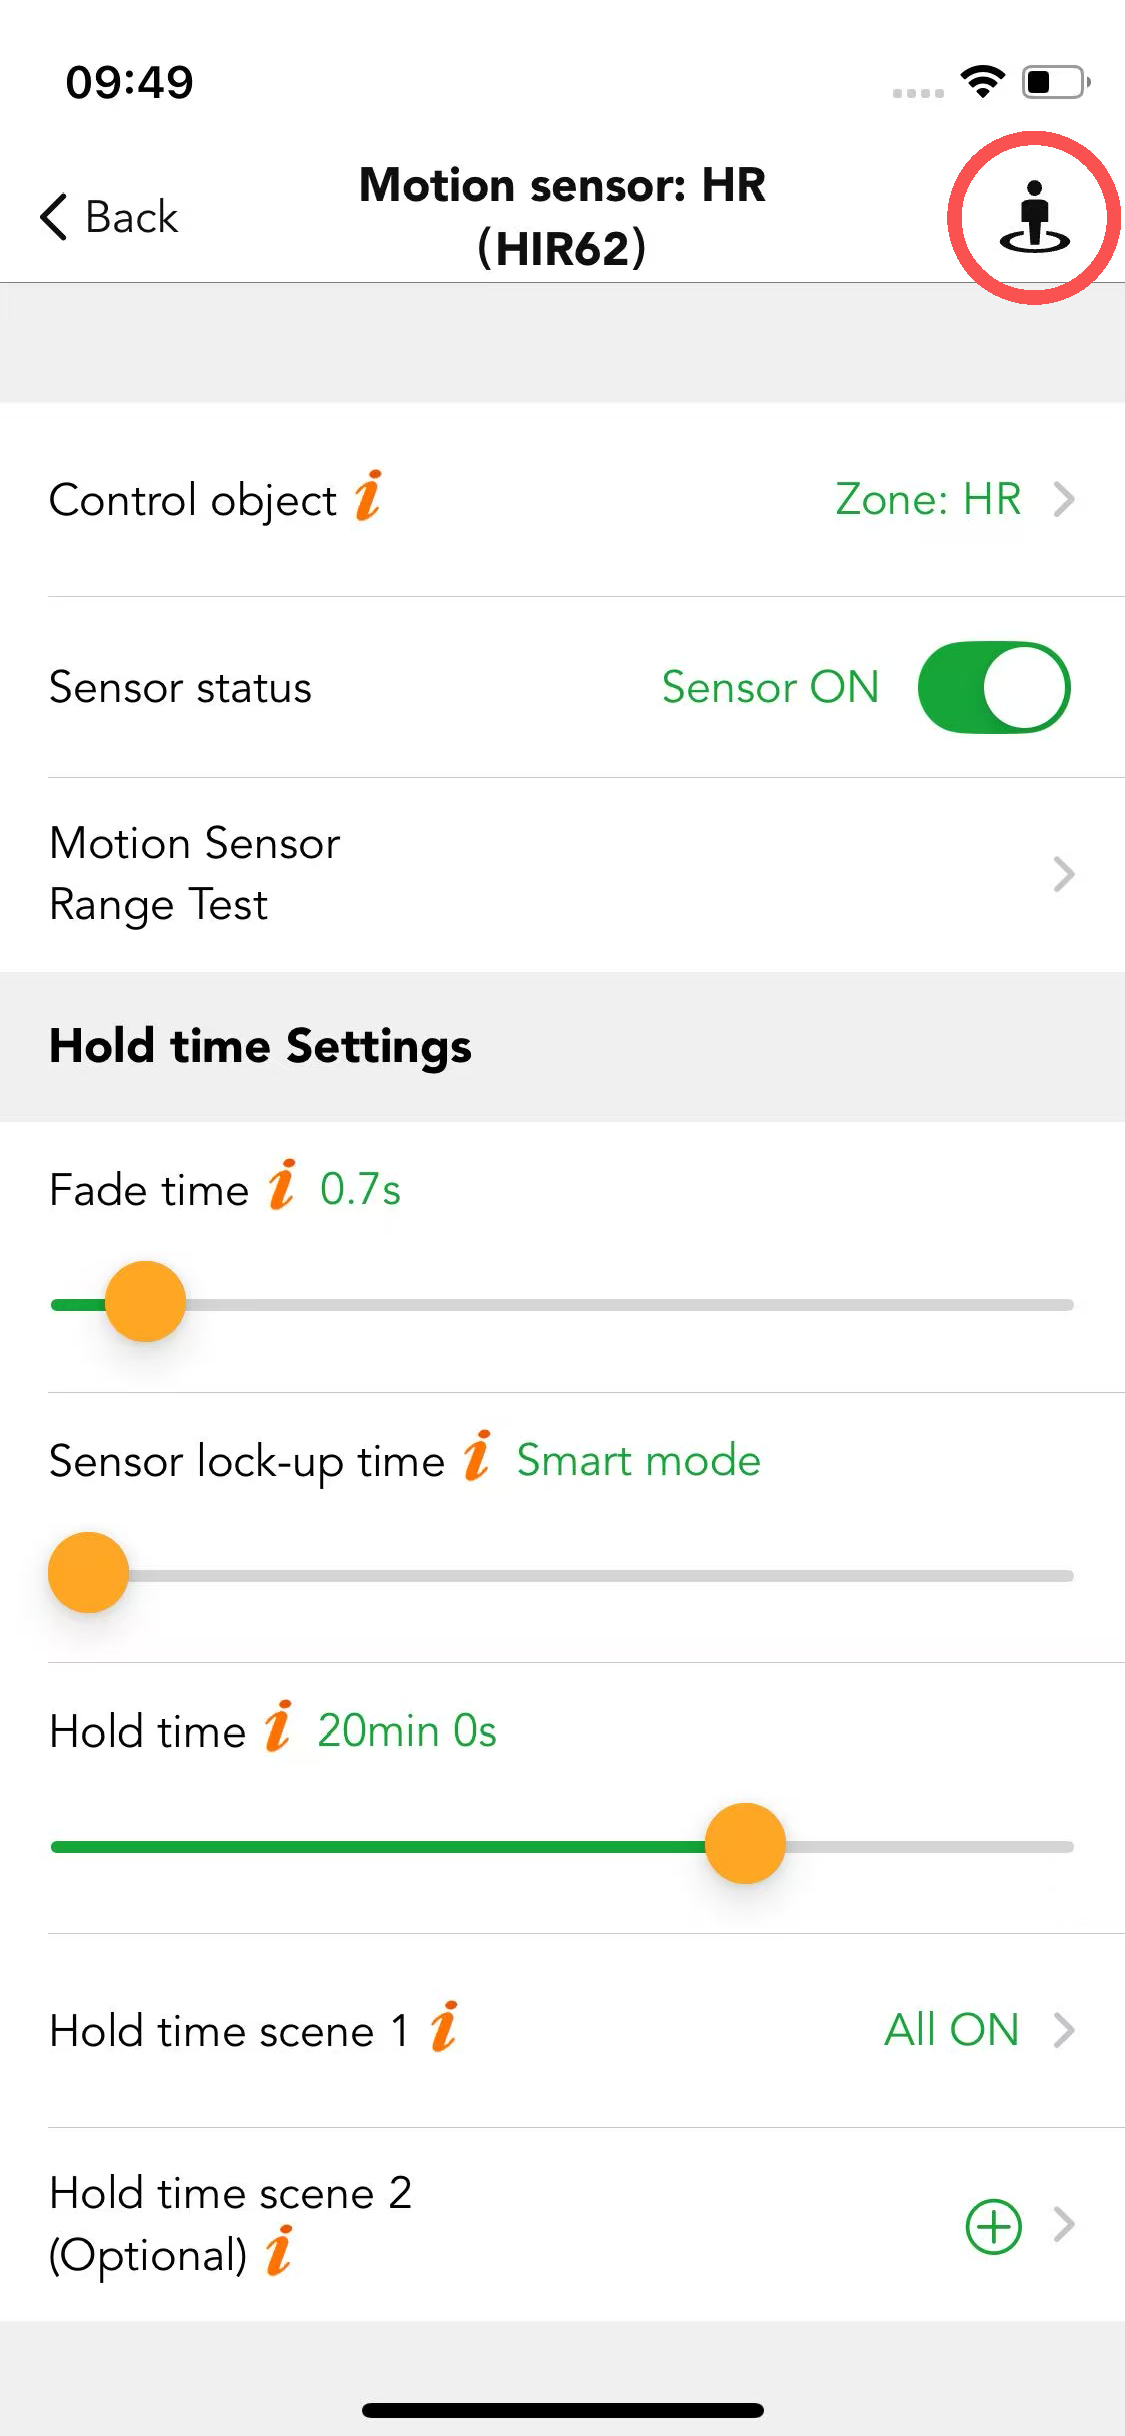
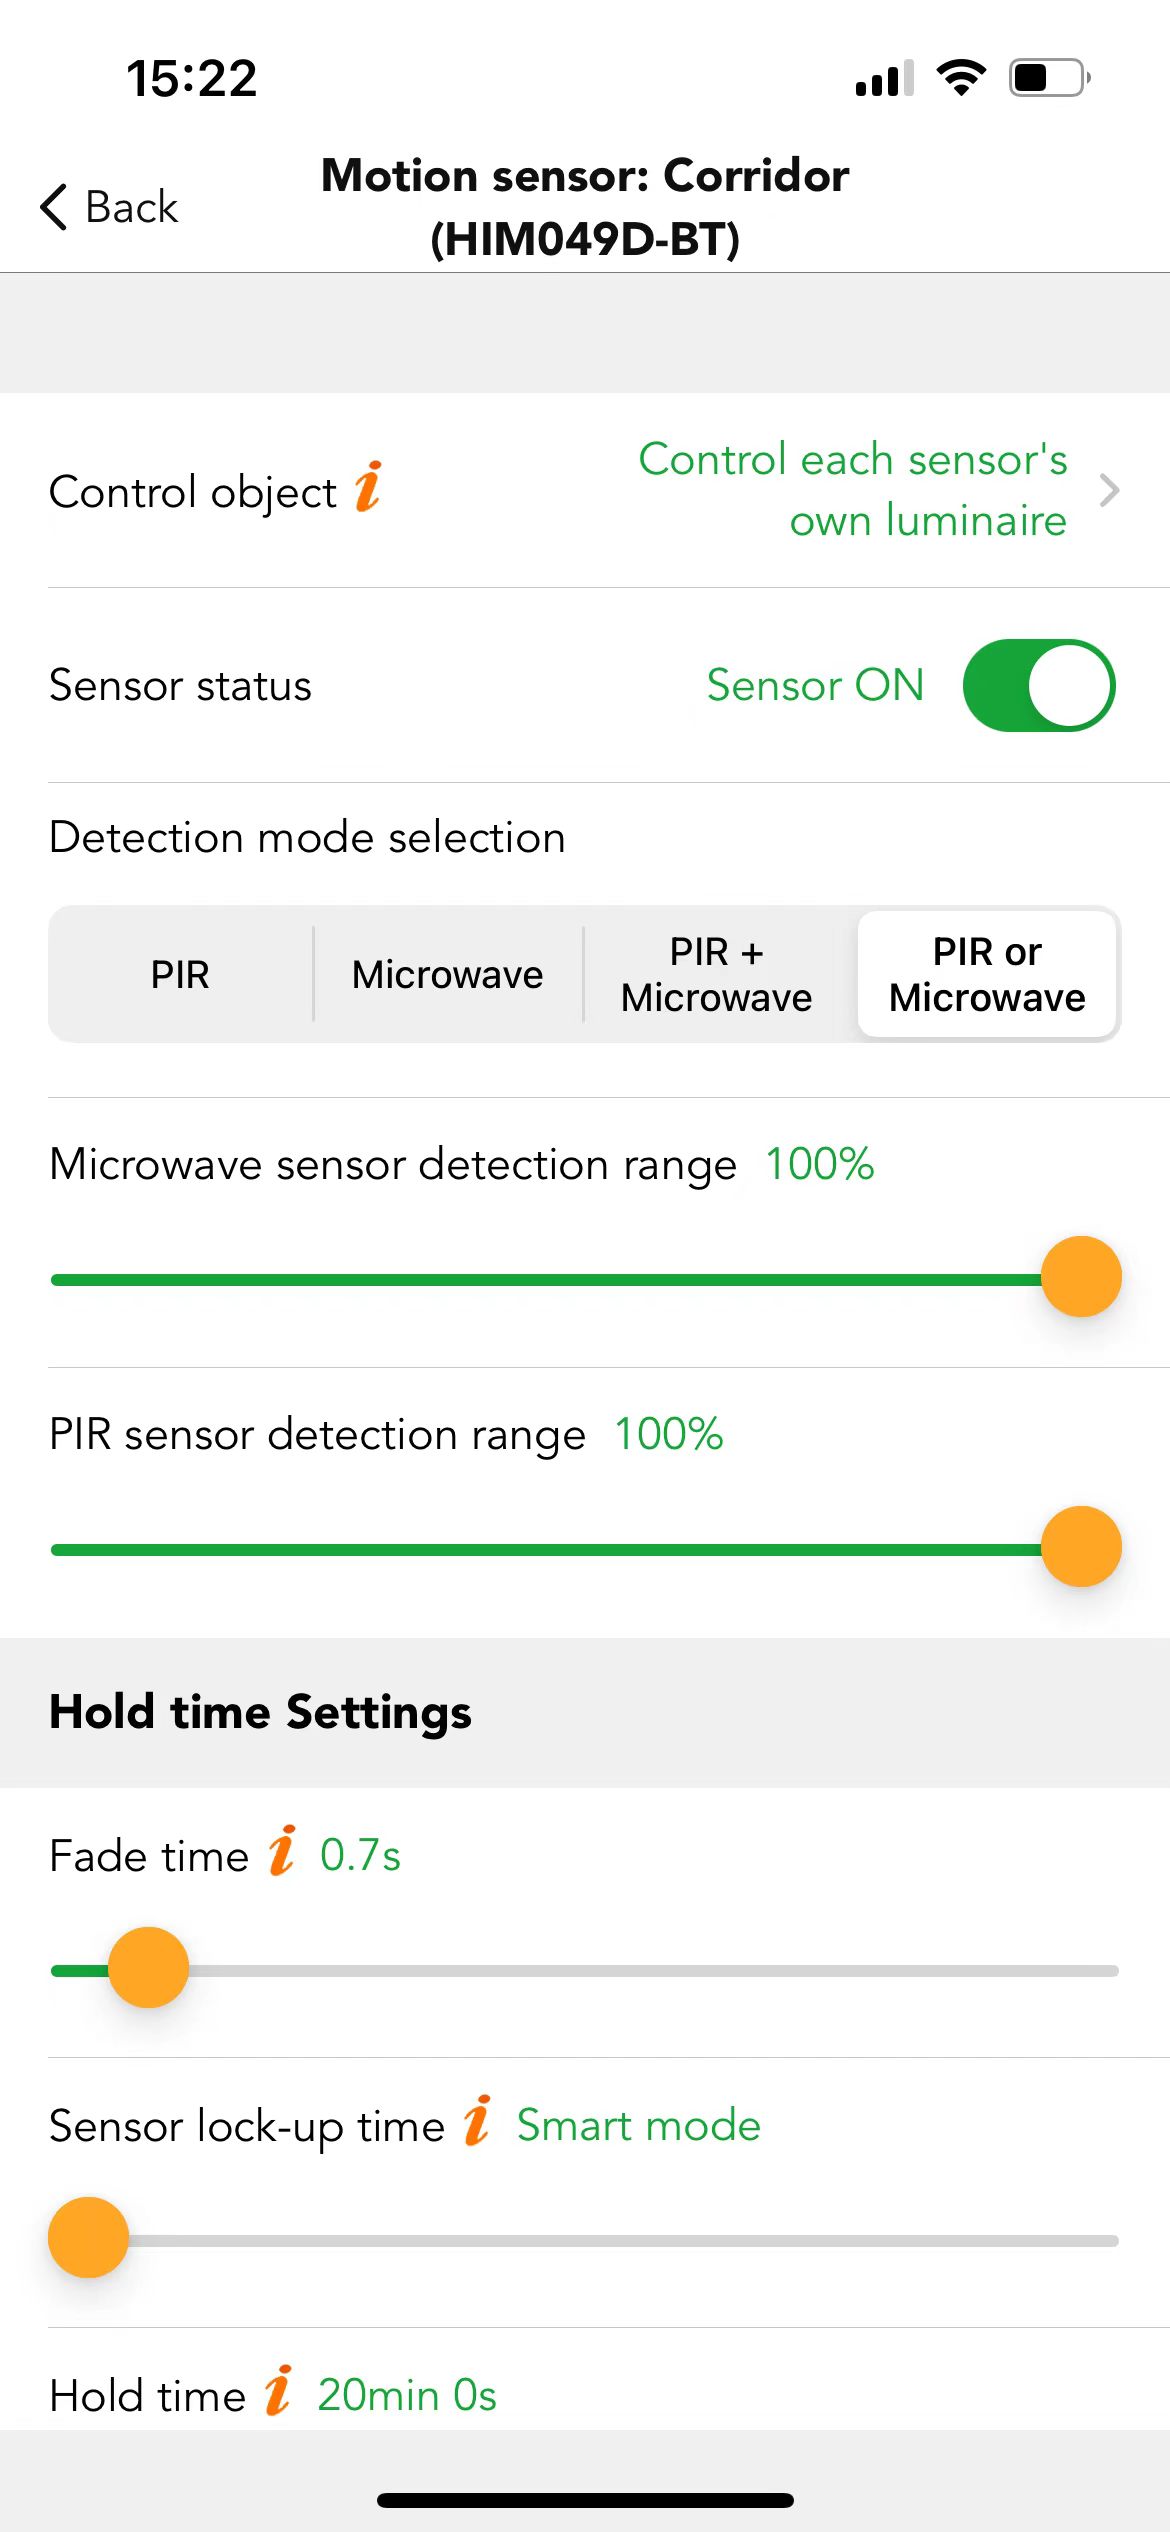
● Control object
Select which object you would like this motion sensor to control, e.g., a luminary, a group, or a zone.
● Sensor status
On: means the motion detection function is on, motion sensor will work as normal.
Off: means disabled the motion detection function. Motion sensors will not work in any conditions.
If the motion sensor is a Microwave sensor, then in the Koolmesh app you can adjust the detection range of the sensor, but this function is not available for the PIR sensors. More details please refer to the Hytronik's datasheet.
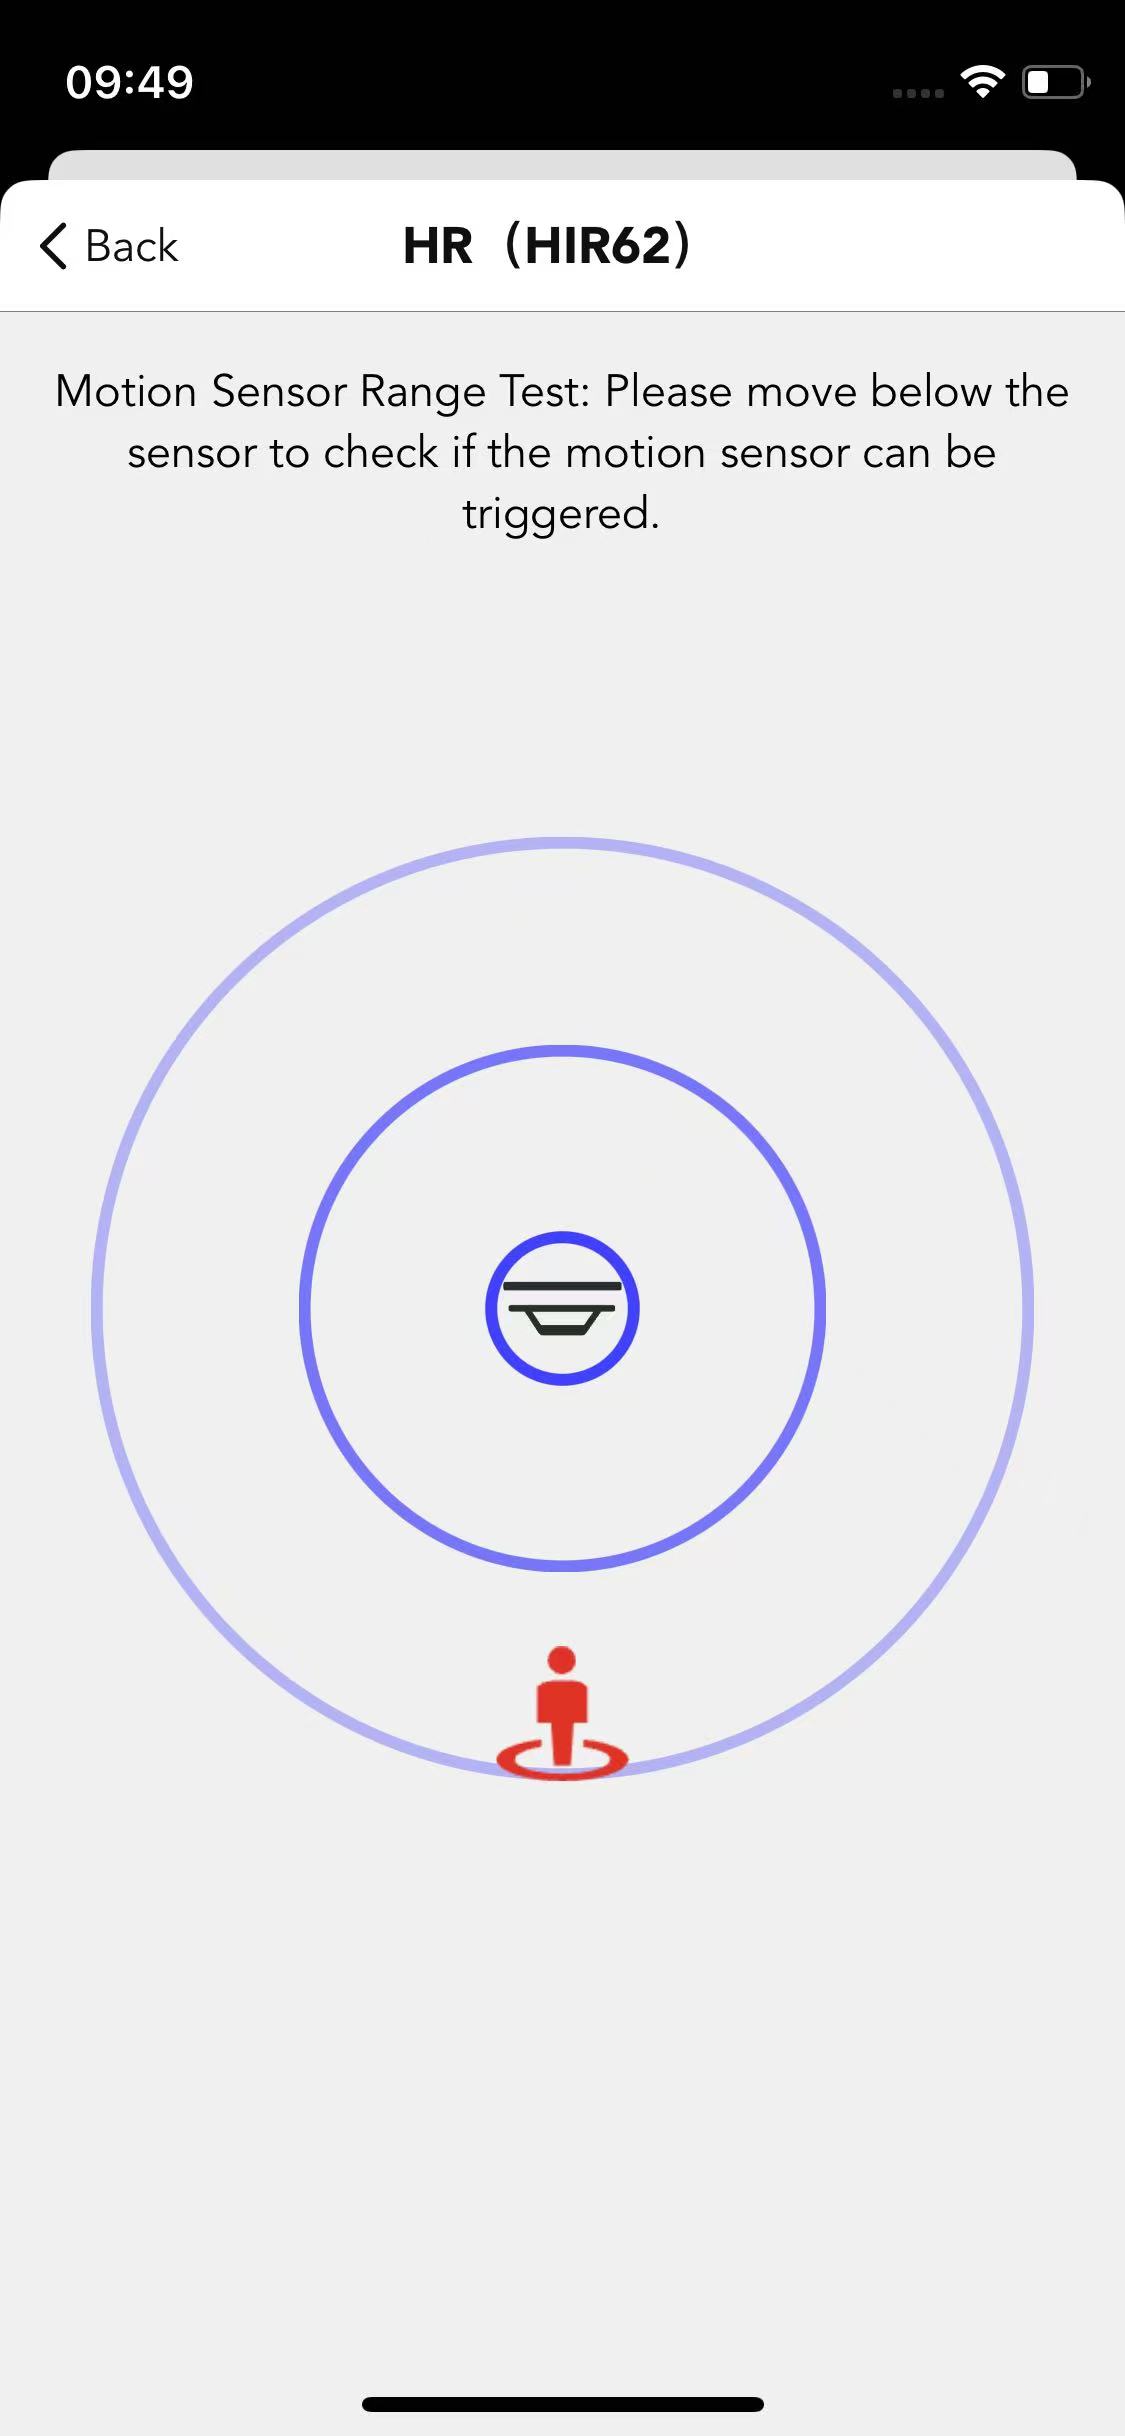
● Motion Sensor Range Test
Click “Motion Sensor Range Test,” or tap the human icon in the top-right corner. Then, move below the sensor as prompted.
When the motion sensor is triggered,a red human icon will appear,and a beep sound will play.This function not only tests the motion sensor’s detection range but also serves as proof that the sensor is working properly.See image below.

● Sensor types differ in detection technology
4 types of motion sensors differ in motion detection technology.
2 types can be recognized from what is shown under the "Sensor status" on the sensor setting page in the Koolmesh app.
1.Microwave (HF) sensor
2.PIR sensor
3.True occupancy sensor
There will be "True occupancy sensor detection range", "True occupancy sensor static sensitivity", and "True occupancy sensor dynamic sensitivity" adjustable under the "Sensor status".
4.Dual-sense sensor
This technology combines both HF and PIR together, providing 4 optional detection modes.
4.1 HF only
4.2 PIR only
4.3 Either HF or PIR When either detector is triggered, the motion is considered valid, and the light will turn on.
This is for maximizing the detection capability.
4.4 Both HF & PIR – Only When both detectors are triggered, the motion is considered valid, and the light will turn on. This is for maximizing the detection accuracy and decreasing the detection capability to prevent the sensor from false trigger by heat source, air conditioner, ventilation vans, elevators etc.
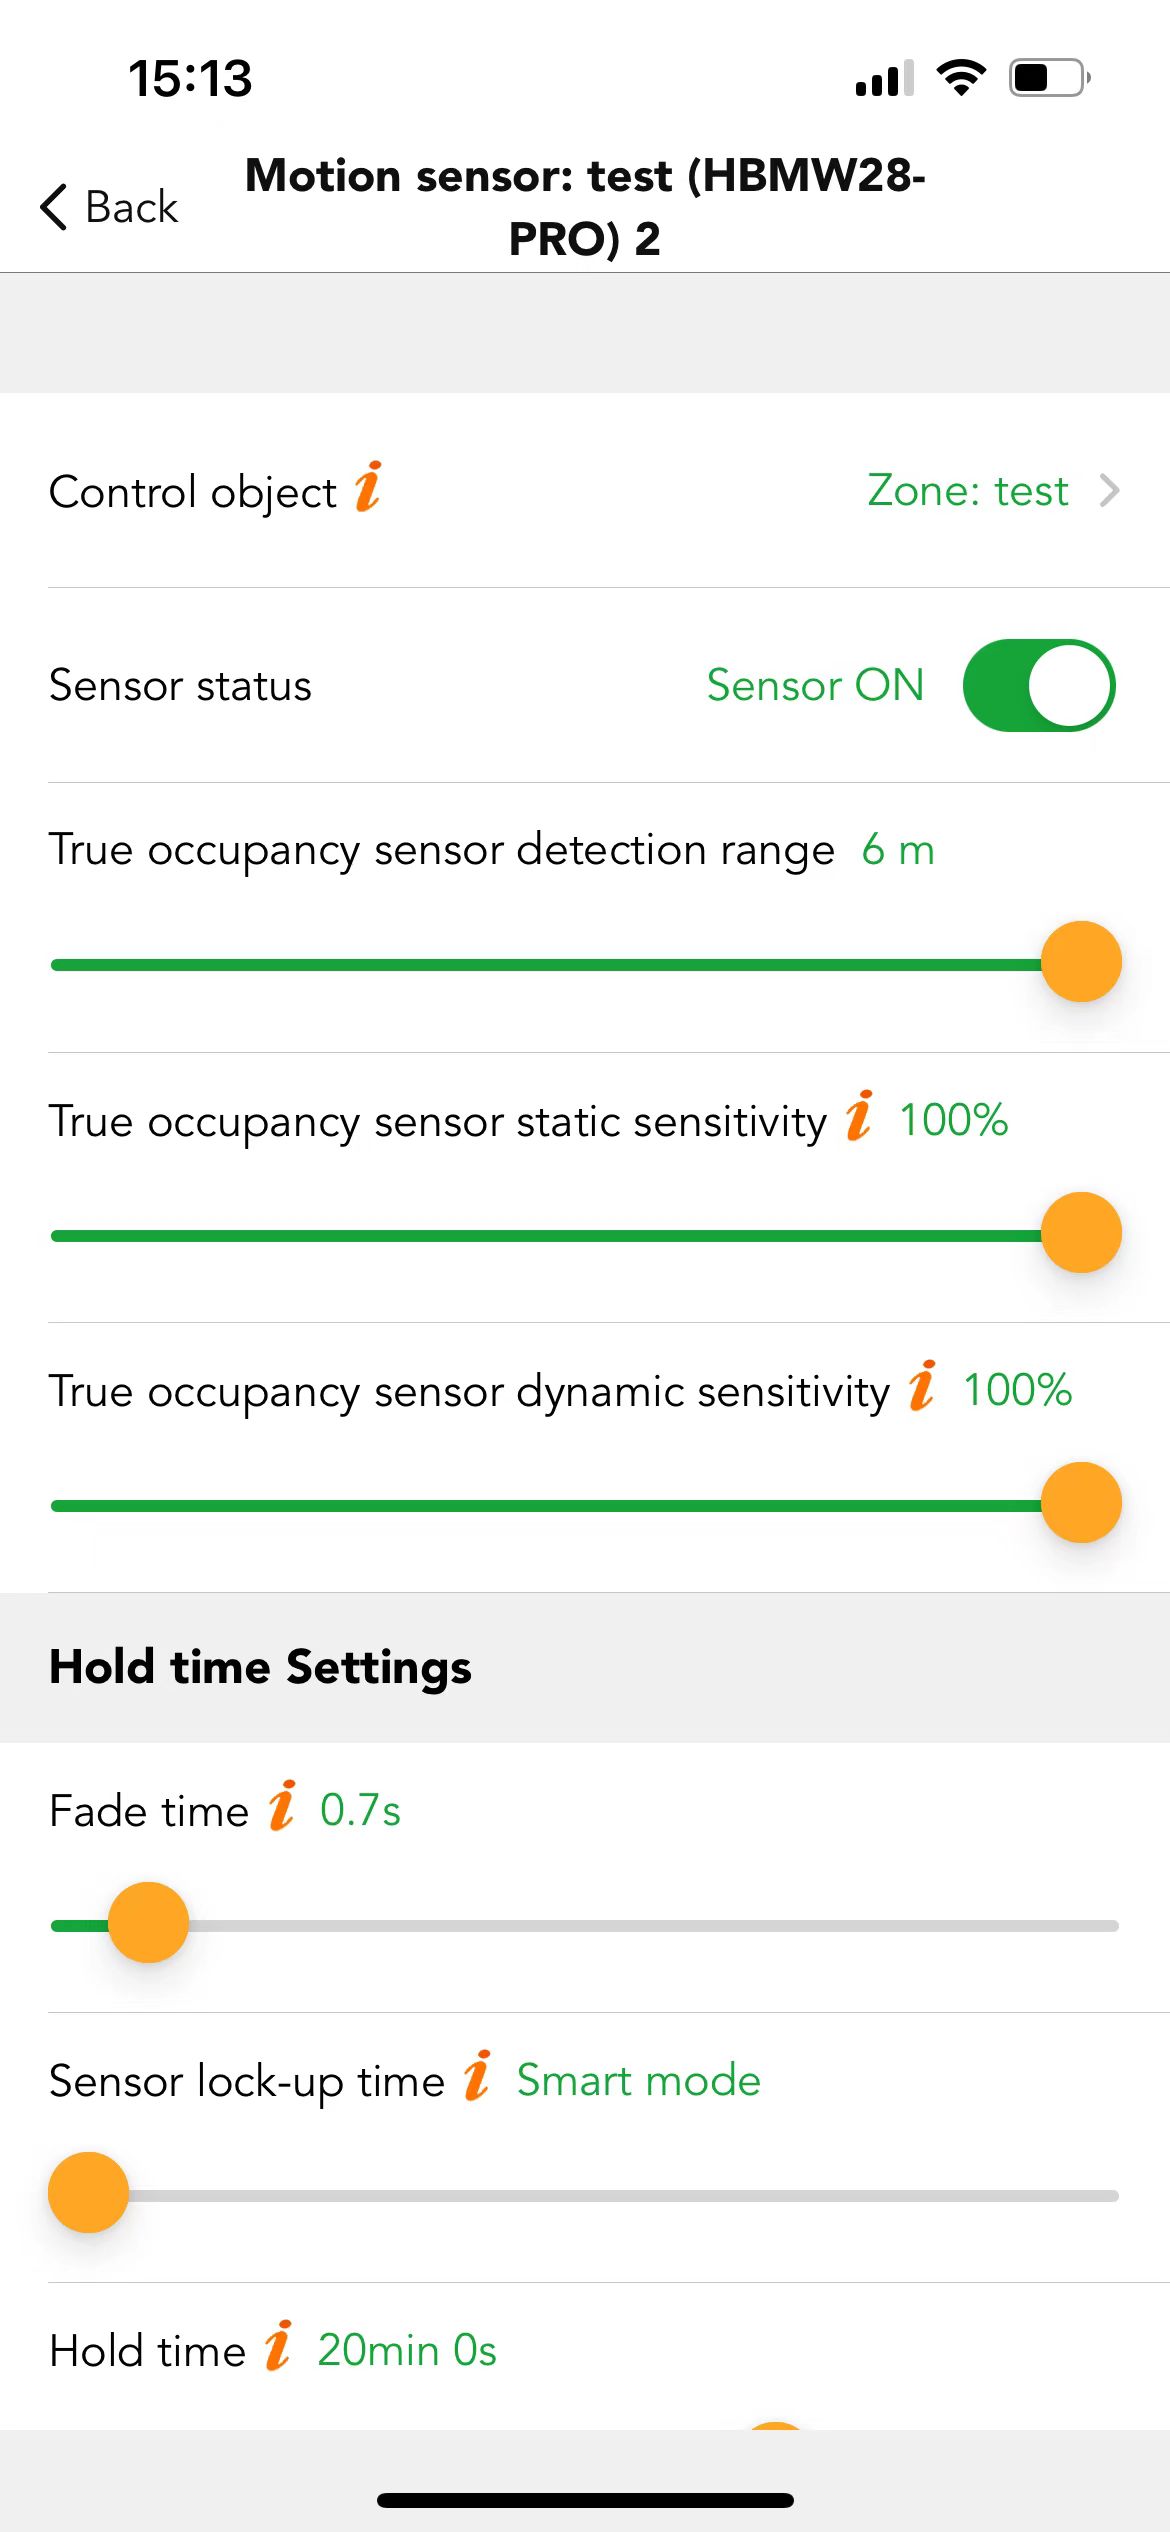
● Hold time settings
A part of the tri-level control, users need to define the hold time and hold time scene. There are also some options under this section.
● Fade time
The time it takes the luminaires to transition from the initial status to the hold time scene status. (Brightness and CCT).
● Sensor lock-up time
The interval between two motion signal commands. For example, if the motion sensor was activated and it will activate the hold time scene for the hold time like 20 mins, so during the 20 mins, if the motion sensor is still being activated, it will keep sending out the motion command to the relevant nodes but those command will not be executed by the nodes. So, this will increase the network congestion and will decrease the network stability. Users can use this option to reduce the useless motion commands by setting the interval time. The default is smart mode that it's the half of the hold time if the hold time less than 6mins; but if users are using smart mode and hold time more than 6mins, then the longest lock-up time is 3mins. For example, if the hold time is 1H, then the longest lock-up time is 3mins. Users can adjust the time by themselves. But we highly recommend using the smart mode.
● Hold time
When the movements were detected by the motion sensor and activate the hold time scene. The hold time scene will last for the hold time, after the hold time expires, it will activate the stand-by time and stand-by time scene.When the motion sensor keeps detecting the movements, then the hold time scene will never expire. It will refresh the hold time until the last movement was detected and keep the hold time scene for a new period of hold t ime, after it's expired it will activate the stand-by time and stand-by scene. The hold time cannot be zero but can be infinity.
● Hold time scene
The scene will be activated during the hold time; the scene needs to be selected from the existing scenes or click inside to create a new scene.
● Stand-by time settings
A part of the tri-level control, users need to define the stand-by time and stand-by time scene.
● Fade time
The time it takes the luminaires to transition from the hold time scene status to the stand-by time scene status. (Brightness and CCT)
● Stand-by time
After the hold time and hold time scene expired, it will activate the stand-by time scene and will last for stand-by time, then the luminaires will turn off. Stand-by time can be zero and can be infinity
● Stand-by time scene
The scene will be activated during the stand-by time; the scene needs to be selected from the existing scenes or click inside to create a new scene.
● Sensor mode
Auto: after the sensor is triggered, the scene is automatically called. The luminaires will be turned off after expiration of hold time & stand-by time.
Semi-auto: the sensor is only activated on the manually press of a Push switch, or via touch panel, or via Enocean switch, or via the app. The luminaires keep being on in the presence and turn off automatically after expiration of hold time & stand-by time (absence detection mode).
● Mode in priority
Manual prior to sensor: the sensor will not interrupt the manual override mode.
Sensor prior to manual: when the sensor is triggered, it will quit manual override mode. Then activate a scene according to the sensor settings.
● Enable staircase function
If it's on, when entering a floor, the luminaires on this floor will go to full ON, while the neighboring upper and
lower stairs will go to dimming level according to the scene pre-set.
● Sensor LED indicator
If it's on, the motion sensor LED indicator will keep flashing when the motion sensor powers on; if it's off, then the motion sensor LED indicator will turn off. This function is available for parts of Koolmesh-ready products from Hytronik, only for those sensors that have an LED indicator, like the HBIR29-BT.
● Automatically send sensor signal when power is restored
This function needs to conjoin the "Power-on status" in the Luminaires section, which decides the status of luminaires after power restored. If it's on then the sensor will send out a virtual motion command to the driver to recall the hold time scene automatically after power restored, which means users do not need to walk around to trigger the motion sensor to activate the hold time scene. If it's off then the sensor will not send out a virtual motion command to recall the hold time scene after power restored, it depends on the "power-on status" in the luminaires section.
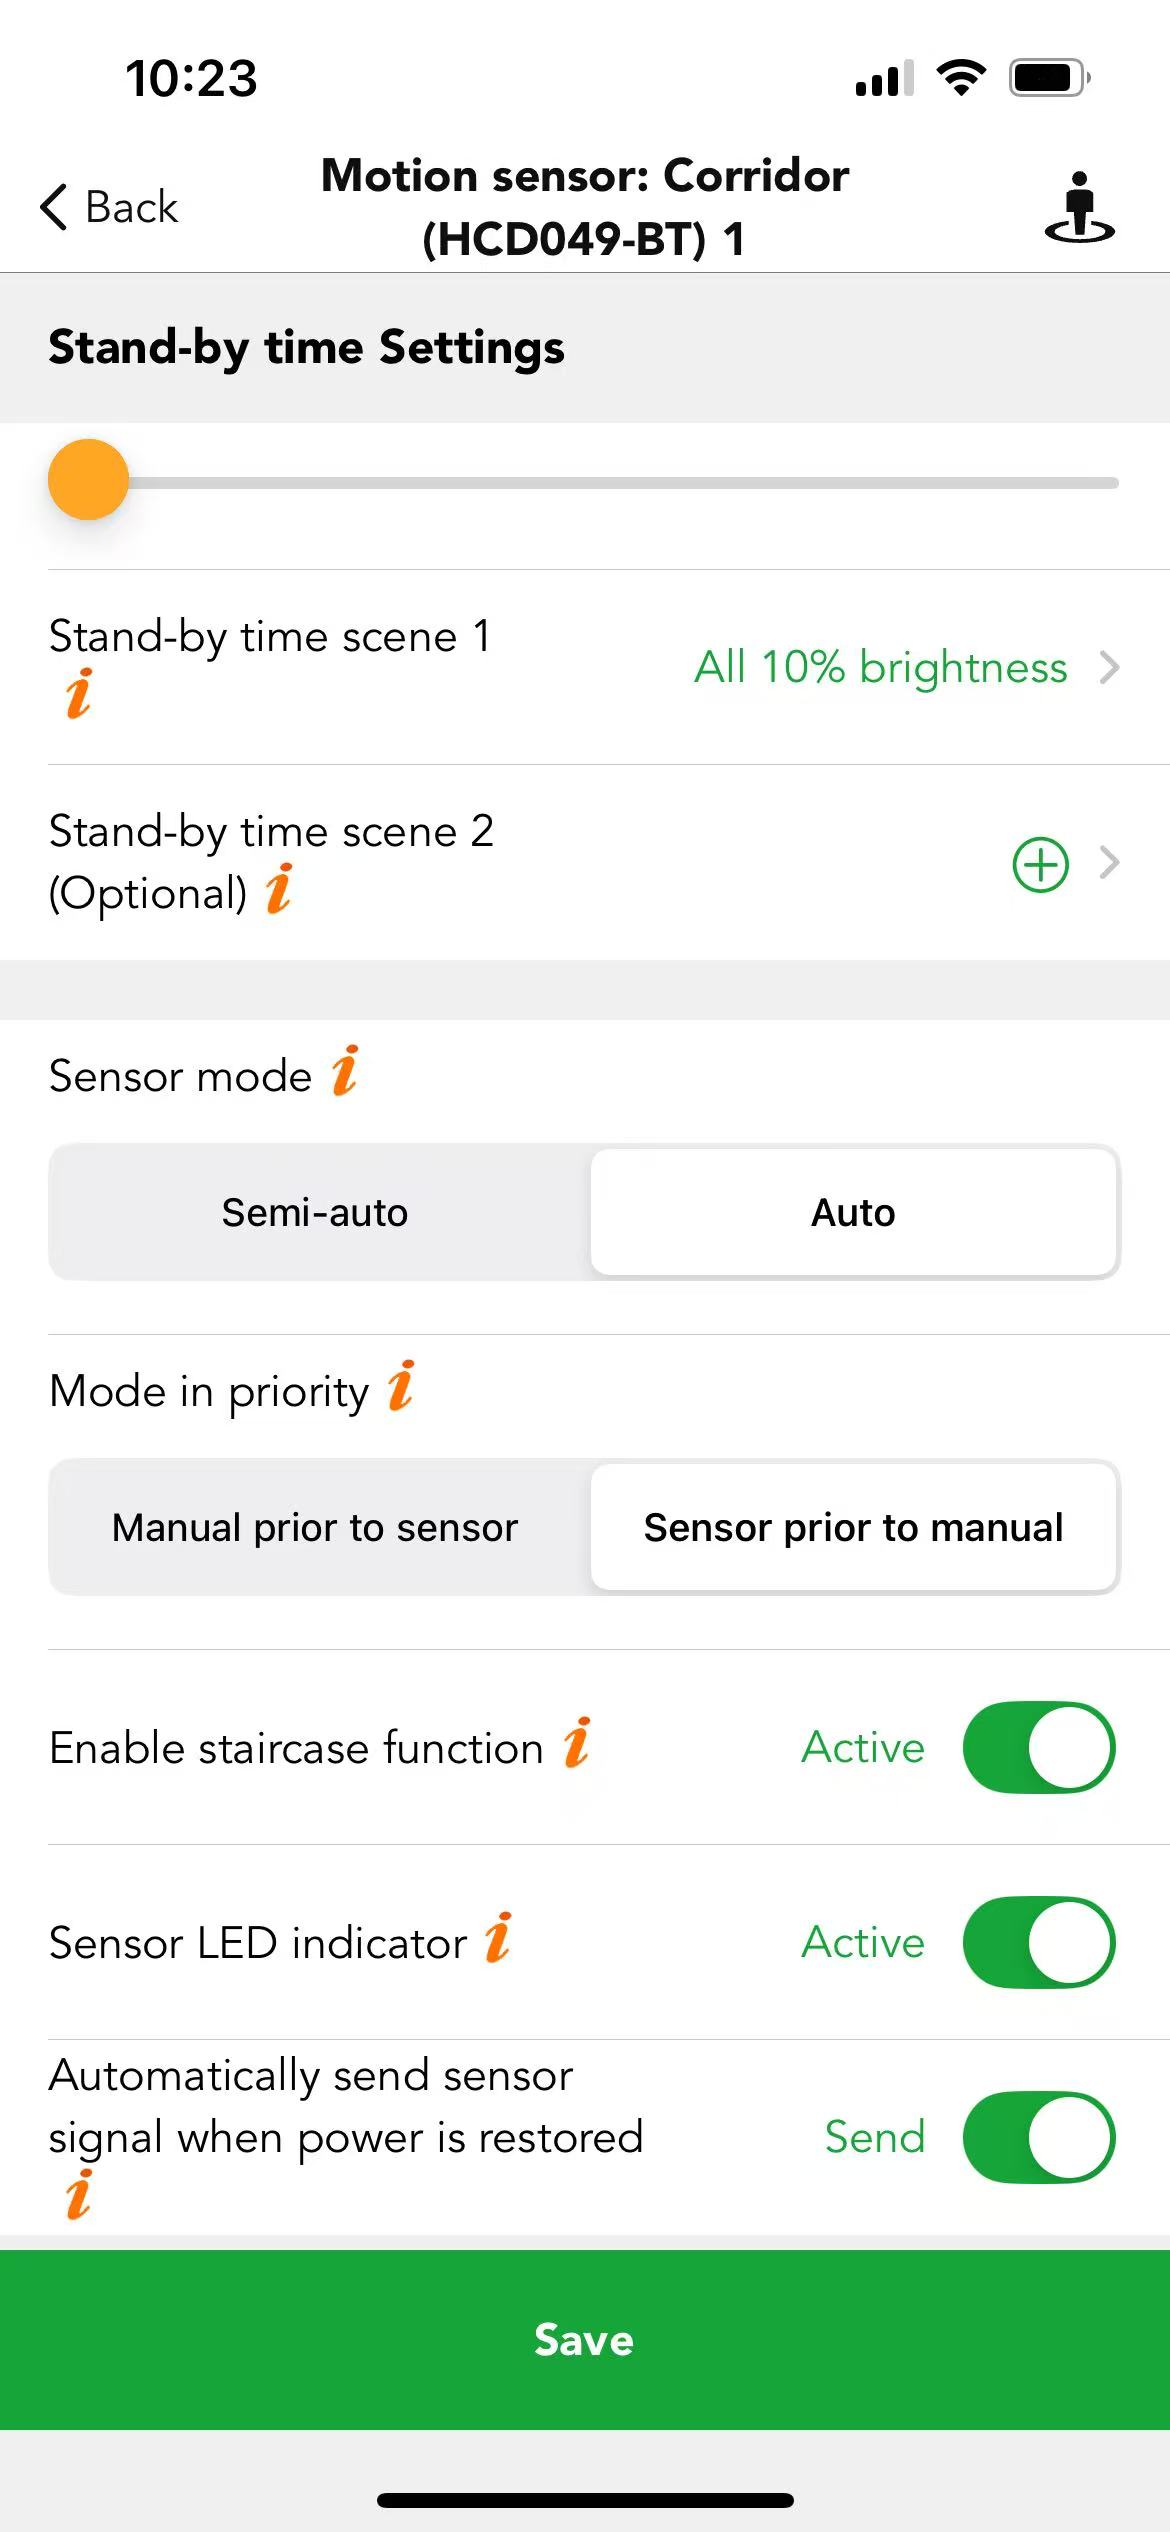
Example: In some applications, users want the luminaires off after power is restored, especially at midnight. If there is a motion sensor involved in all user's settings, then users need to turn off the "Automatically send sensor signal when power is restored" and select "keep light off" for the Power-on status in Luminaires section. Otherwise, the luminaires will run tri-level after the power is restored which may lead to unnecessary complaint from neighbors.